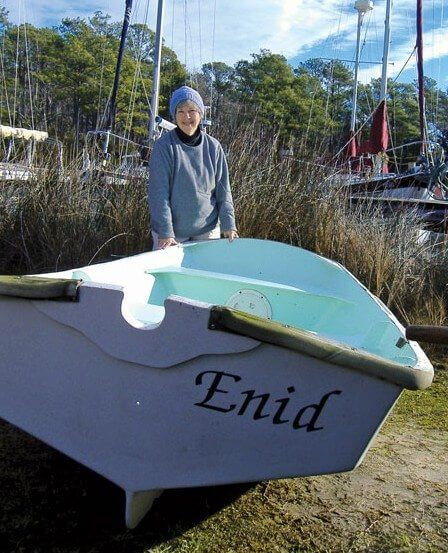
Drakus, the Monk 47 Ketch currently under a boatyard tent receiving a fiberglass replacement for her tired teak decking, inspired one spirited small town librarian, Anne Siddens, to build the dinghy, Enid. While Siddens’ husband Doug worked refurbishing Drakus as their permanent, itinerant home, house-sitting provided the couple temporary quarters. Of course, in order to maintain cruising life aboard, the Siddens had to have a dinghy, which they call a ‘car,’ for Drakus.
A flyer about a boat building class arrived one day from the local community college. Anne was intrigued. She contacted the school and found a disappointing two-year wait-list for the class. But now the seed had been planted; Anne and Doug went online looking at dinghy plans. Anne says, “Doug picked out the plans and I built the dinghy, telling him not to touch it unless I asked for help.” Then she asked Doug for, and received lessons on how to use a circular saw and to drill precisely as marks directed…on the first try. By the time she felt confident with the tools, she had received the plans and instructions for a Prameke Dinghy ordered from Bateau.com, and her head was full of lists of necessities she had to gather with Doug’s help: marine plywood, resin, fiberglass tape, paints, zip ties and ultimately, a wood craftsman for special carving. A friend provided a garage work area as reality took shape – and space.
Then came measurements and ratios, mental images and numbers for the conversion of little shapes on paper to proportionately larger shapes Anne needed to scribe on eight-foot plywood sheets.
“I liked that part best,” she said. “As a kid, I moved a lot with my family. Mom had little colored pieces she set about on floor plans until she decided where to tell the movers to put furniture. I used her technique for my templates, and enjoyed it.”
Anne cut out her frame pieces: mid- and outside panels, four “just shy of eight-foot” sections, drilling and inserting zip ties loosely where the pieces would come together. Slowly, she tightened the ties to form the shape that would one day carry Doug and her and groceries and supplies as though it were the family station wagon.
“Doug showed me how to use matchsticks,” Anne said, “so the pieces wouldn’t touch, allowing resin into every joint. Then I made ‘peanut butter’ of resin thickened with wood flour, and filled all the little cracks, making ‘fillets.’ Everywhere wood showed at all, I put resin. When the resin had cured enough, I put fiberglass tape down on the seams, but not all over (in order to save weight).”
Many times Anne turned to Bateau2.com for the technical help they provided and especially for the posts by other amateur boat builders using Bateau plans or kits. “To read what others had learned in their projects and the pride they took in their finished and useful products was wonderfully helpful when I came to discouraging parts,” Anne said.
Both bow and stern are flat, providing accessible dry storage, and “three resin coats cover all the wood, taped or not. Being sure no wood would meet water,” she said, “I even put resin in every screw hole.” Another house-sitting job provided an empty dining room which, well-tarped and protected, became a boat shed…until the time was up and the friends came home, moving Enid onto the screened porch.
Anne asked wood craftsman Matt Bannister in Oriental, N.C., to carve teak strips from her precise templates. With resin, she laminated the strips onto the dinghy in four layers “like a petit four with resin filling,” she said, “as rub rails around Enid’s sides and bow, protecting the lovely curve of the hull.” Bannister also fashioned strips to complement the transom design. Anne cut round openings for access to under-seat storage at both bow and stern, purchasing and installing threaded watertight hatch covers, to keep dry goods dry when day-trips on rough water might be necessary.
When life interfered, as it did several times during her creation, Enid waited under a tarp. Anne, finally getting back to her finishing tasks in the winter of 2011-12, did much more sanding, painting and the installation (using screws all around) of a tough foam filled fabric gunnel guard atop the rub rails. One January day, that final phase completed in the garage of yet another friend, Anne, Doug, and the garage owner hauled Enid to the dinghy ramp at Sail Craft Marina and launched her, as yet unnamed, on her maiden voyage. Anne (who had never rowed before) borrowed oars and took her dinghy out into Whittaker Creek.
The only water in the boat upon her builder’s triumphant return was droplets from the occasional crab caught by the inexperienced oars-person laughing as she zigzagged over the wide water.
“Building Enid wasn’t easy,” Anne said. “It was hard! And some days I asked myself ‘Why am I doing this, anyway?’ But when I was done, there was such a feeling of satisfaction in completing the [totally uncharacteristic] project…. It was the way you feel when you turn in a really big term paper. Accomplishment. Pride. Relief!”


