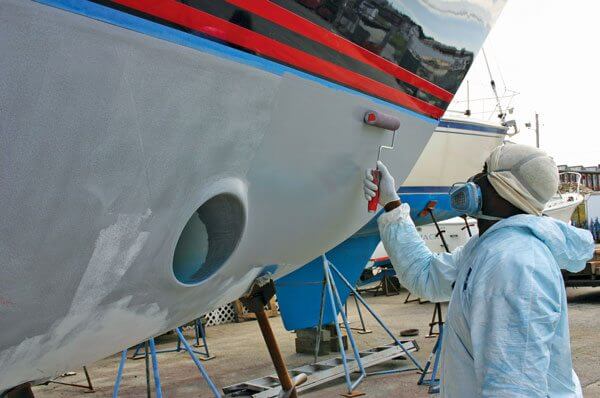
Do you have trouble bringing your boat alongside a dock when the wind is blowing, or turning your boat when leaving your slip? Boats with a lot of top hamper often have these problems, necessitating the use of a spring line. A bow thruster may be in your future. Installing one is not difficult, however, it does require an understanding of working with fiberglass and electronics.
Before you begin, check to see if the bow of your boat has enough space to fit a bow thruster. You’ll need a transverse tube up to 6-inch diameter (depending on the size of the thruster), space for the thruster motor and control box, and either heavy duty cable from existing batteries or a new battery box installed near the control box and cables leading back to the alternator on the engine for charging. Typically, the space under a forepeak bunk is large enough to meet these requirements in any boat over 35 feet in length.
Next, decide on the size of the thruster. This is a job best left to a professional who has installed similar thrusters on many different types of boats and has a good idea what works best. That being said, it will pay to do your homework prior to making the purchase. The size should be based upon several items:
• Displacement and length of your boat.
• Amount of windage your boat has.
• Underbody shape for example, a long-keeled boat will need a more powerful thruster than one with a fin keel.
• Amount of topsides and upper deck. Higher topsides and more superstructure will require a larger thruster.
• Power and type. Twelve-volt power is typical, but some boats have 24v, 48v or 110v systems.
The install begins by cutting a large hole, from three to six inches in diameter, transversely across the bow of the boat. The tunnel will fit in this hole. With the tunnel in place, it is tabbed, cut to length and fiberglassed into place. By putting a slightly raised fairing at the front of the hole, it helps to ease water flow across the hole when sailing.
With the tube fully glassed in place, a hole is cut in the top of the tube to install the thruster drive shaft. In most cases the thruster motor will sit vertically over the shaft, but some motors have their main axis running horizontally fore and aft. When installing the drive shaft, make sure all seals are installed properly or you may get a leak.
Install the battery box or cables from the existing battery to the battery box. At this stage you will need to connect the thruster control box to the controller (in the cockpit or bridge) and to the battery. Most manufacturers supply a wiring diagram if you plan to do this yourself.
The last job is to install the thruster propeller in the tunnel and make sure it is fixed in place with cotter pins or clips as required by the manufacturer. Forgetting this essential part has caused the thruster propeller to drop off! Try the thruster out of water to ensure it revolves before the boat is launched, but don’t run the motor for long when testing. It is designed to operate in water, not in air.
You are now ready to launch the boat and try the thruster. Docking will now be a breeze!
Step-by-step DIY Thruster installation
1. Measure back from the bow on both inside and outside of the hull to ensure the thruster is exactly at 90 degrees to the centerline.
2. Drill a pilot hole before cutting the main hole.
3. Offer up the tube, without cutting it to length to make sure it fits perfectly.
4. If it fits, most fiberglass experts will tab it into place and check the position both transversely and vertically before doing a full fiberglass job. The tube is cut off when about 90 percent of the fiberglass work is done.
5. Finish glassing in place and complete the final fairing on the outside of the hull.
6. Install the controller in the cockpit or bridge and run the wires through the hull to the controller box in the forepeak.
7. Install wires from the battery to the thruster motor and connect up the controller box.
8. Briefly test the installation.
9. Launch the boat and check for leaks.
10. Test the installation in the water.
11. If everything works, smile!


