












Boat Bottom Paint: The Complete Guide to Antifouling

Boat bottom paint—antifouling—is the coating that keeps algae, barnacles, and other marine growth from taking hold on your hull below the waterline. Get it right and your boat runs faster, burns less fuel, and stays healthy between haul-outs. Get it wrong and you are back in the yard within months. This guide walks through everything a boat owner needs: the types of antifouling, how to choose the right one, and how to remove, apply, and maintain it—with an eye on the warm, high-fouling waters of the Caribbean, some of the harshest in the world.
Start Here: Four Questions That Decide Your Bottom Paint
Before you compare brands, answer these four questions. Together they point you to the right family of paint.

- How fast is your boat? A fast powerboat (20–30 knots) needs a hard paint—a softer ablative will simply wear away under the rush of water. Mid-range and sailboat speeds suit ablative paints.
- How foul is the water? Where rivers meet the sea, or in warm estuaries, growth is aggressive and you need a paint with a high biocide load.
- How warm is the water? Warm water breeds more growth. Caribbean and tidal-flat boats need stronger antifouling than boats in cool northern harbors.
- How often do you use the boat? Regular use suits ablatives (the motion keeps fresh biocide exposed). If you dry-sail or trailer, look for a multi-season paint that keeps working after it dries out—many antifoulings oxidize and stop working once hauled.
Types of Antifouling Paint
Every antifouling falls into one of a few families. The differences come down to how the paint releases its biocide and how it behaves when the boat is hauled.
| Paint type | Best for | How it works | Watch out for |
|---|---|---|---|
| Hard (modified epoxy / contact-leaching) | Fast powerboats, racing sailboats, frequently scrubbed hulls | Forms a solid film that releases biocide on contact with water | Must be repainted before relaunching once hauled; layers build up and eventually need stripping |
| Ablative (self-polishing) | Cruisers and slow-to-moderate-speed boats in regular use | Wears away gradually like a bar of soap, exposing fresh biocide | Not effective if the boat sits idle for long periods; wears too fast above ~25 knots |
| Self-polishing copolymer (SPC) | Boats that may be hauled and relaunched mid-season | Only the layer touching seawater reacts, so lower layers stay intact | Higher cost than basic ablatives |
| Hybrid (partially soluble) | Owners wanting long protection with modest buildup | Erodes slowly while releasing biocide | Still contains copper (restricted in some areas); needs periodic recoating |
| Copper-free | Aluminum hulls, outdrives, eco-conscious owners, restricted waters | Uses non-metallic biocides or slick silicone-type surfaces | More expensive, newer technology |
| Rosin-based (traditional) | Slow or stationary boats on a budget | Older, cheaper chemistry | Usually must be launched within about 24 hours of painting |
Modern paints no longer rely on copper alone. Biocide boosters such as Irgarol and zinc, and slime-fighting additives, let the copper work more effectively and for longer—because it is the slime layer, forming a month or so after launch, that lets growth get its first foothold.
How to Choose the Right Paint for Your Boat
The racer, the cruiser, and the weekend fisherman may all own fiberglass boats, but their antifouling needs are very different. Match the paint to three things:
Your hull material
- Fiberglass → standard ablative or self-polishing paints work well.
- Aluminum boats, outdrives, and outboards → you must use a copper-free formula to prevent galvanic corrosion.
- Dinghies and tenders → flexible, low-maintenance paints that survive repeated beaching.
- Wood and steel → follow the manufacturer’s system, usually starting with the correct primer.
Your budget
High-performance antifoulings cost more per gallon, driven largely by copper prices and the research behind newer eco-friendly formulas. But a longer-lasting, self-polishing paint can reduce how often you repaint—often the cheaper choice over a few seasons.
Where you boat (and the law)
The warm, salty Caribbean creates some of the toughest fouling conditions anywhere, so boats here lean toward high-biocide ablatives or hard paints for high-fouling areas. Regulations matter too: TBT (tributyltin) paints are banned across the U.S., U.K., EU, and much of the Caribbean, and copper-based paints face tightening rules in some jurisdictions (Sweden and Denmark already regulate them by leach rate and vessel size). If you cruise internationally, choose a globally accepted paint to avoid trouble at the border. When in doubt, ask your local boatyard manager what performs best in your specific waters.
How to Remove Old Bottom Paint
Stripping old antifouling before a fresh job helps the new paint adhere, lets you inspect the hull, and clears built-up layers. Old paint is toxic, though, so removal has to be done carefully. There are three main methods.
- Wet sanding — best for DIYers. Minimizes toxic dust; can be done by hand or with a dustless sander. Requires gloves, mask, and goggles, and the residue must be collected and disposed of properly. Many yards offer dustless sanding services.
- Chemical strippers — effective but hazardous. Removes multiple layers at once and is kind to delicate surfaces, but it is highly toxic, needs proper ventilation and PPE, and must be disposed of as hazardous waste.
- Soda or sandblasting — best left to professionals. Fast and thorough, and it reaches awkward areas, but it needs specialized equipment and skill and can damage fiberglass if done wrong. Ideal for heavy paint buildup or metal hulls.
Inspect the hull while it is bare
A stripped hull is your chance to catch problems early:
- Blisters and osmosis: small bubbles in the gelcoat, sometimes with water behind them. Grind them out, let them dry completely, and fill with marine-grade epoxy. Serious osmosis is a job for a professional.
- Gelcoat cracks: sand and fill small stress cracks with a gelcoat repair compound; get larger structural cracks looked at by a yard.
- Keel, outdrives, and props: check metal components for corrosion, and rudders and centerboards for wear.
How to Apply Bottom Paint—DIY or Pro?
Once the hull is clean and repaired, you face the real decision: do it yourself or pay the yard?
Most boatyards let owners (and regular crew) work on their own boats for a lay-day fee, usually charged per foot per day, plus water and electricity. Some allow outside contractors; some require you to use their approved list. Labor to apply antifouling is often charged per coat, per foot. Whatever the arrangement, get the terms—and the price—in writing, and confirm you will have access to power and water.
Doing it yourself saves money and a good crew of boating friends makes it faster—but it is a major undertaking, and the most common causes of paint failure are launching before the paint is fully dry and not letting coats dry between applications. If a rushed weekend job goes wrong, the time and expense are lost. Hiring professionals costs more, but they already own the safety gear, meet environmental rules, and have done it hundreds of times. If this is your first haul-out, a pro job—or volunteering alongside an experienced friend—is the safer bet.
Prep and application steps
- Lightly sand the hull to create a good adhesion surface.
- Apply an epoxy barrier coat to guard against osmosis, if needed.
- Wipe down with acetone or the recommended solvent to remove dust and oils.
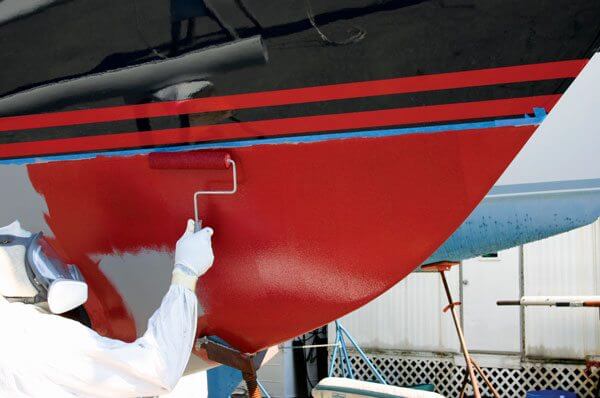
- Mask off the waterline and fittings.
- Roll on at least two coats for even coverage, following the manufacturer’s drying times—and never launch before the paint is thoroughly dry.
One rule worth repeating: never paint over old, unknown bottom paint without checking that the two are compatible.
A Real-World Bottom Job: Fixing Blisters at the Waterline
Here is how this plays out in practice. The owners of Arctic Tern, an Island Packet 45, had painted their own bottom since 2006. In 2008, small blisters appeared under fresh paint at the waterline and on the rudder. A paint specialist in Trinidad delivered good news: these were not osmosis blisters in the fiberglass—they were the result of many layers of paint and wear at high-stress areas, where the paint’s volatile chemicals had not dried evenly.
The advice was to live with them until the only real fix—removing all the paint—became worthwhile. In 2011 the owners had the yard grind off roughly 16 years of accumulated paint, a punishing job where the margin between the last coat and the gelcoat is a few thousandths of an inch. With the hull bare and inspected clean, they applied a two-part epoxy barrier coat, then rebuilt the system coat by coat—taping around the jack stands so no bare spot was left when the stands were moved. The lesson: paint blisters and osmosis blisters are different problems, and letting layers build up for years only makes the eventual strip harder.

Caring for Your Bottom Paint Between Haul-Outs
Even the right paint fails if it is neglected. Bottom paint commonly fails for five reasons:
- Improper prep or application—paint peels from a poorly prepped surface, and a too-thin coat has a short life.
- Slime—a slime layer greatly reduces or stops the paint’s antifouling action.
- Damage—touching bottom or brushing a pier can scrape paint and start growth, even with no structural damage.
- Heavy-handed cleaning—use the gentlest method that works: a soft cloth or low-pressure wash on ablatives, the least abrasive option on hard paint.
- Improper grounding—stray electrical current in the water neutralizes antifouling fast, just like it eats your zincs. Keep the electrical system sound and properly grounded.
A good routine: inspect the hull every three to six months, scrub growth off before it hardens, and plan to repaint every one to three years depending on the paint and your waters. Boats in warm Caribbean water usually need repainting more often than boats up north.
Prefer to skip paint altogether?
A few owners avoid antifouling entirely: in-water boat lifts that raise the whole hull clear of the water, enclosed in-water mooring systems that starve growth of food and oxygen, or land-based and rack storage for trailerable boats. If you go paint-free, seal the gelcoat with an epoxy barrier, keep the hull waxed, and wash it down after each use.
Antifouling and the Environment
Keeping a hull clean has always come with an environmental cost. For decades, TBT-based paints were the gold standard—until scientists in the 1970s and 80s documented severe damage: female shellfish developing male reproductive organs and collapsing in number, toxicity to oysters, and TBT accumulating up the food chain into fish and mammals. It has been called “the most toxic substance ever deliberately introduced into the marine environment.” In 2001 the International Maritime Organization adopted a convention banning TBT antifouling worldwide.
Today’s paints lean on copper, zinc, and biocide-free technologies—but copper is now under its own scrutiny, and low-copper and copper-free formulas are growing. Newer approaches include slick silicone-based coatings, ultrasonic antifouling systems, and graphene and nanotechnology coatings still in development. There is a cruising angle too: fouling on hulls carries invasive species between harbors, which is one more reason—beyond speed and fuel—to keep your bottom clean.
Bottom Paint FAQ
How often should I repaint my boat’s bottom?
Typically every one to three years, depending on the paint type and how warm and foul your water is. Warm Caribbean berths tend toward the shorter end.
Can I use copper bottom paint on an aluminum boat?
No—copper on aluminum causes galvanic corrosion. Use a copper-free antifouling on aluminum hulls, outdrives, and outboards.
What is the difference between hard and ablative paint?
Hard paint forms a durable film that suits fast and frequently scrubbed boats but builds up and must be repainted before relaunching. Ablative paint wears away to expose fresh biocide, avoids buildup, and suits cruisers in regular use.
Do I have to remove old bottom paint every year?
No. You usually only strip to bare hull when layers have built up heavily, the paint is failing, or you are switching to an incompatible system. Otherwise a light sand and fresh coats are enough.
What is the best bottom paint for the Caribbean?
The harsh, warm water favors high-performance ablatives or hard paints formulated for high-fouling areas. The single best move is to ask your local boatyard what is performing well in your exact waters.
Bottom Paint — Go Deeper
Antifouling is one of the most deliberately confusing corners of boat ownership—shifting product names, competing chemistries, and marketing that muddies more than it clears. These pieces from Caribbean marine authorities cut through it.
Cutting through the confusion
- Why Paint Companies Keep Renaming Antifouling Products — Robbie Ferron
- Additional Insight Into Antifouling in the Caribbean — Robbie Ferron
Green & the environment
- How Green Is Your Boat? — Roger Marshall
At the boatyard
- Use Your Yard Time Wisely — Carol Bareuther
- Caribbean Boatyard Updates — Carol Bareuther
Compiled and updated by All At Sea from J. Summer Westman’s Bottom Paint Guide series. Always follow your paint manufacturer’s specifications and local environmental regulations.
Worth your time?
Thanks — noted.