

A flexible sprayhood is a wonderfully practical thing. It keeps the cockpit dry during passages or on rainy days, but it can be folded away in case you sail with a purist who needs wind and waves directly in his/her face, if you want to reduce windage preparing for a storm at anchor or when you get the boat ready for storage. The disadvantage of foldable plexi windows is their limited lifetime. We rinsed off our sprayhood after each passage, took care not to get any chemicals on the windows that might harm the material and managed to keep them for ten years. At some point they turned milky, but we gradually adapted to the limited view and got used to peeking through the gap between sprayhood and bimini. In the end the windows got so brittle that one of them was smashed in during a rough passage, maybe by a flying fish, maybe by a flogging rope, we never found out. We did a make-shift repair with masking tape underway to keep the splashing waves out and to save the potted plants in our sprayhood garden from a salty death.
After arriving at our destination we contemplated our options. Sailing on was a no-go, but we were on a remote island with no professional sailmakers to turn to. We fretted, pondered the issue, made some calls, ordered material, worried a bit more and finally tackled the project. The dreaded project was easier than imagined and the result turned out better than expected, so we decided to share our newly-acquired knowledge with you.
Here are 10 steps to a clear, wrinkle-free DIY vista from the cockpit:
1. Material needed
A sewing machine (a professional sailrite would be great, our old, sturdy Pfaff house-hold machine did the job as well), a roll of foldable plexi (material thickness between 0.5 mm and 1 mm), UV-resistant thread (we use Tenara, teflon-based indestructable stuff), house-hold scissors, a seam-remover (or better two), two pairs of steady hands and good nerves.

2. Planning in 3D
A sprayhood is a complex 3-dimensional construction that becomes thoroughly confusing when you have to make it 2 D in order to fit it on the saloon table and into the sewing machine. It is therefore important to make a detailed project plan, mark port and starboard as well as up and downsides on all windows before taking the dodger off.

3. Cutting the old window
The old windows keep the fabric in shape, so you want to keep them in as long as possible. We therefore did NOT remove the old seams, but sliced the old plexi material right between the two parallel, old seams, leaving them in place.

4. Cutting the new plexi
Foldable plexi is easy to cut with household scissors. We cut the new material roughly in shape, leaving a broad margin on all sides–to be on the safe side in case of errors.

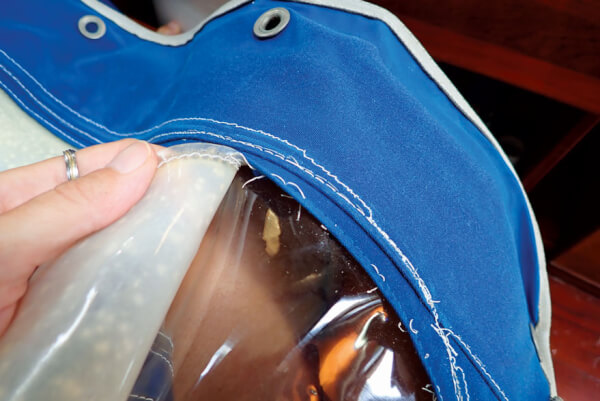
5. Taping on the new plexi
We pressed the new windows firmly to the inside of the old material. Then we taped it down. Using double-sided tape would make the work easier and more exact, but we didn’t have any, so we made do with regular masking tape, which unfortunately cannot be applied on the inside, but just around the fringe.

6. Sewing the outer seam
The next challenge is to get the sprayhood to fit into the sewing machine without ripping the tape accidentally off. We rolled it as tightly as possible to be able to squeeze it into the machine, inner side of the sprayhood facing up. Then we sewed a new seam just outside the old seams, staying parallel to the outer one. We did the long, straight lines first (pressing down the material and straightening all the time) and only did the rounded corners last–squeezing and pulling the material in order to do curved seams could easily dislodge the two layers of plexi and lead to wrinkles.

7. Removing the old seam
Now it’s time to remove the inner one of the old seams gently with a seam-remover–scissors would be too risky as you could easily slip and damage the new window.
8. Removing the old window
As soon as the seam is off you can pull out the old window and remove all bits of thread. The outer one of the old seams simply stays in place and does not have to be removed.

9. Adding an inner seam
We rolled the fabric up again, stuffed it back into the machine and added an inner seam, staying close to the edge of the sunbrella. As a last step we cut off the excess material on the outside. Tada! First window finished!

10. Replacing the other windows
Now you simply have to repeat the procedure until all windows are replaced, mount the sprayhood, wash off the cold sweat, settle down in the cockpit and enjoy the long-missed panorama!
Birgit and Christian have been sailing, makeshifting and improving their SY Pitufa for ten years. Check out their blog www.pitufa.at for more info!

