
Oops! You’ve hit a piling and punched a hole in the inflatable. Now you have to repair it. Of course, the easiest way is to take it to a repair shop, but if you are in a rush to use your inflatable, you may have to do the job yourself.
To get a neat repair, you’ll need several things.
The first is to remember that inflatables can be ruined with careless work. A friend who used to run an inflatable repair shop told me of a person who learned that a glued neoprene inflatable can be taken apart by heating the seams with a heat gun. After he’d taken most of the boat apart, he couldn’t put it back together and had to get an (expensive) professional repair job.
When you want to mend a small hole without the patch showing, opening up a seam and repairing the hole from the inside is a perfect solution. But you must know what you are doing or the job can be botched.
Here are ten steps to the perfect repair of your dinghy inflatable:
1. Cut your patch to the right size. Make sure that the patch material is similar to the material of the existing boat and of the same thickness. (Put neoprene patches on neoprene boats and PVC patches on PVC tubes!) Be sure to round the corners of the patch to prevent them from peeling.

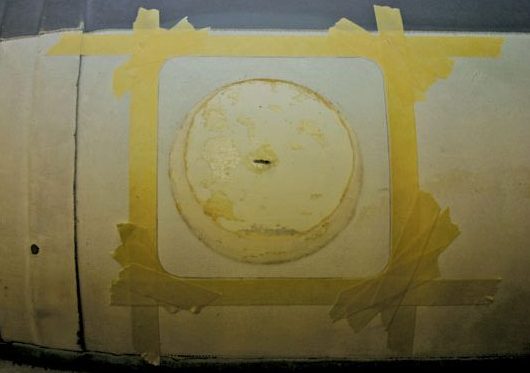
2. Next, mask off the area where the patch will go. Lay the patch on the hull and mark around it to get the correct area. Carefully trim the rounded corners.

3. Remove oxidized neoprene by lightly sanding inside the trim area. You can use sandpaper for this purpose, but professionals use a Dremel tool with a sanding stone. This ensures that the entire area is properly cleaned.

4. Wipe off the area with a solvent to remove any grease or oil. Wear gloves to keep the solvent off your hands and make sure that you are working in a well ventilated area. Solvent fumes, as well as glue fumes, can be harmful and are highly flammable. Do NOT put fingers on the sanded area after cleaning it.
Looking for a Good Cruising Sail? Tips and Guidelines for Dacron

5. Mix freshly opened glue. Do not use old glue, the glue tends to lose its effectiveness over time. When working with glue, it contains VOCs so you should wear disposable gloves and work in a well ventilated area or use a respirator. Apply the glue with a disposable chip brush with the bristles cut down to about 3/8”. This brush allows you to work the glue into the material.

about 3/8 inch. This allows you to work the glue into the
fabric of the hull. Let the glue dry.
6. Coat both the patch and the sanded area with the freshly mixed glue and give the glue about ten minutes to set up.

7. Coat both surfaces again and press them together, making sure the patch is aligned properly. Getting the right alignment can be tricky because both the patch and the hull are coated with glue. As soon as glue touches glue, it sticks.

8. Use a roller to press the patch down onto the hull and eliminate any air bubbles. You’ll find that the tube needs to be either totally deflated or partially inflated to do this job properly. Do not try it with the hull inflated or the air will bubble out under the patch.

9. Removing the masking tape and wipe the area with a solvent to remove any glue residues. Be sure to dispose of unused glue carefully. It is highly flammable.
10. After 24 hours inflate the tube and check for leaks.
The job is not difficult if you have the right materials and take your time, and it can save a trip to the shop or better still, make the inflatable ready and bring your dinghy back from the dead.
Roger Marshall is a yacht designer, author of fifteen books and has repaired a number of family owned boats.


I’d recommend a product called fixmytear. It’s a repair tape which sticks very well to vinyl, canvas, inflatables, leather and most other surfaces. Absolutely life saving tape.